Walk through requested by kiraitachi on how to run QRadar Community Edition 733 on QEMU/KVM.
The guide used in this tutorial can be found in the YouTube description section of the video guide.

Walk through requested by kiraitachi on how to run QRadar Community Edition 733 on QEMU/KVM.
The guide used in this tutorial can be found in the YouTube description section of the video guide.
Steps for installing WAZUH all in one instance. These are the steps we used including the steps for installing the agents on Linux, windows and macOS / OSX.
The back story for the guide is we used OSSEC for many years and our setup worked fine with sending the OSSEC events to a syslog server for additional reporting. We decided to move to WAZUH as it has a nice interface and reporting. Also the installation and management of the solution is straight forward and simple to use. We have subsequently convinced and started to migrate some of our clients to WAZUH with great results and positive feedback. We therefore decided to put this quick guide together to provide our clients and the community a quick reference to deploy their own standalone instance should they want to. The all in one install we deployed can support up to +/- 100 agents.
- - - - - START HERE - - - - - PDF version Min recommendations & specs we used (we have 20 agents in our environment) Ubuntu Server 20.06 2x CPU 6 GB RAM 250 GB HDD NIC - - - - - ssh to your Ubuntu Server instance.ssh yourusername@yourserveripSet root passwordsudo passwdEnter the new root password Confirm the new root passwordsuEnter the password you just set. Install WAZUHapt-get install libcap-ng-utils unzip curl -so ~/all-in-one-installation.sh https://raw.githubusercontent.com/wazuh/wazuh-documentation/4.0/resources/open-distro/unattended-installation/all-in-one-installation.sh && bash ~/all-in-one-installation.shOpen your web browser and navigate to your servers ip https://yourseversipaddress or FQDN Adding agents Note you need to substitute your server FQDN or IP address where we have yourserver Linux (Ubuntu 20.04 Desktop) Open the terminal and run the following commandssudo apt-get install curl sudo curl -so wazuh-agent.deb https://packages.wazuh.com/4.x/apt/pool/main/w/wazuh-agent/wazuh-agent_4.0.4-1_amd64.deb && sudo WAZUH_MANAGER='yourserver' dpkg -i ./wazuh-agent.debStart the agentsudo service wazuh-agent startWindows Open the powershell ISE as administrator and run the following commandInvoke-WebRequest -Uri https://packages.wazuh.com/4.x/windows/wazuh-agent-4.0.4-1.msi -OutFile wazuh-agent.msi; ./wazuh-agent.msi /q WAZUH_MANAGER='yourserver' WAZUH_REGISTRATION_SERVER='yourserver'Mac Open the terminal and run the following commandcurl -so wazuh-agent.pkg https://packages.wazuh.com/4.x/macos/wazuh-agent-4.0.4-1.pkg && sudo launchctl setenv WAZUH_MANAGER 'yourserver' && sudo installer -pkg ./wazuh-agent.pkg -target /Start the agentsudo /Library/Ossec/bin/ossec-control start- - - - - EnD - - - - -
—Start Here—
Update the system.
Assuming you have an existing Ubuntu server setup.
sudo apt update && sudo apt upgrade
Install some base applications
sudo apt install -y php php-cli php-common libapache2-mod-php apache2-utils sendmail inotify-tools apache2 build-essential gcc make wget tar zlib1g-dev libpcre2-dev libpcre3-dev unzip libz-dev libssl-dev libpcre2-dev libevent-dev build-essential
Enable rewrite, Apache & Start Apache.
sudo systemctl enable apache2
sudo systemctl start apache2
sudo a2enmod rewrite
sudo systemctl restart apache2
OSSEC Server Install
wget https://github.com/ossec/ossec-hids/archive/3.6.0.tar.gz
sudo tar -xvzf 3.6.0.tar.gz
sudo /home/hgadmin/ossec-hids-3.6.0/install.sh
Note: Provide your preferred input as prompted. For the demo we opted for the below:
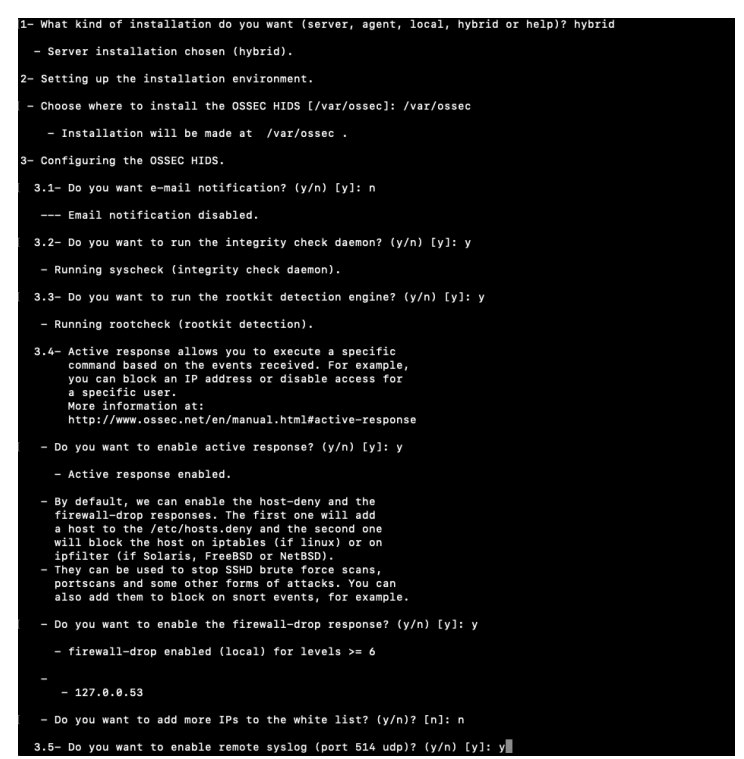
Input your servers IP address or hostname (FQDN)

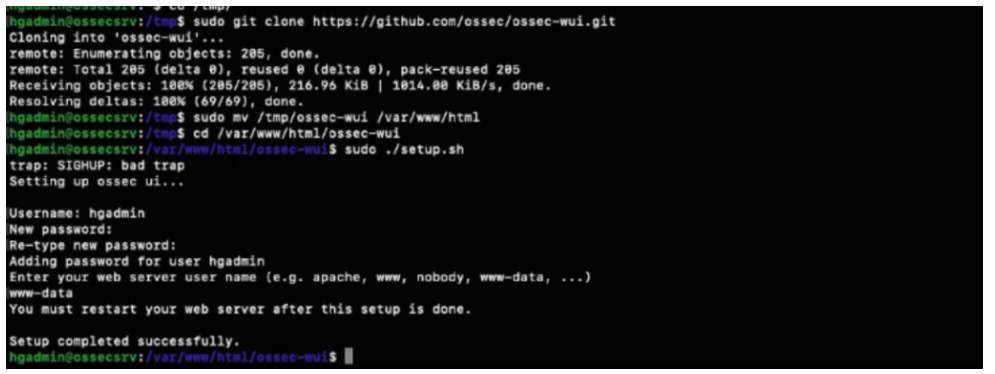
Installing the Web User Interface.
cd /tmp/
sudo git clone https://github.com/ossec/ossec-wui.git
sudo mv /tmp/ossec-wui /var/www/html
cd /var/www/html/ossec-wui
When prompted enter your chosen username and password. For the web server name enter www-data.
Set the permissions
sudo chown -R www-data:www-data /var/www/html/ossec-wui/
sudo chmod -R 755 /var/www/html/ossec-wui/
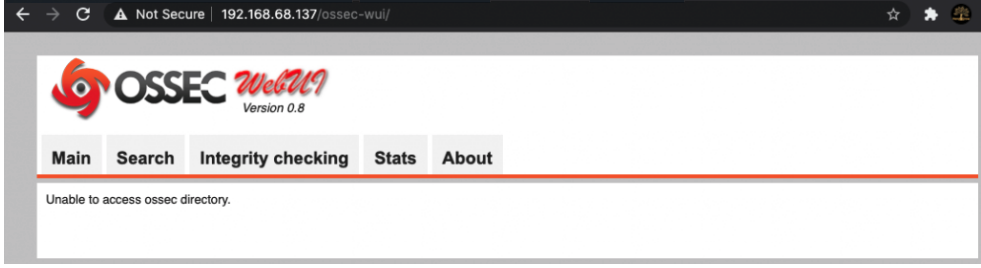
Restart Apache and launch Web User Interface
sudo systemctl restart apache2
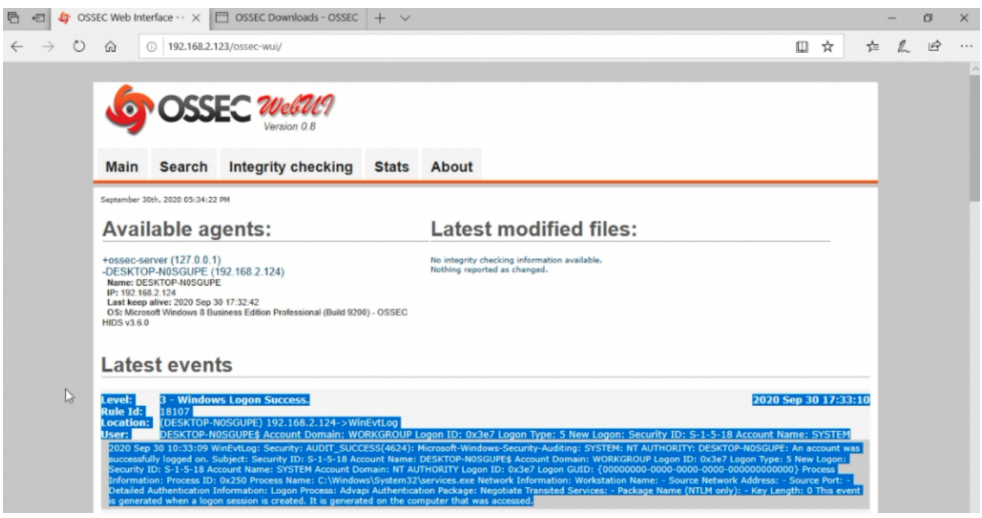
Open a web browser and navigate to http://your-servers-ip/ossec-wui
Windows Agent Install
Download the OSSEC agent from – https://updates.atomicorp.com/channels/atomic/windows/ossec-agent-win32-3.6.0-12032.exe
Open the command prompt and ssh to your ossec server.
ssh hgadmin@192.168.68.123
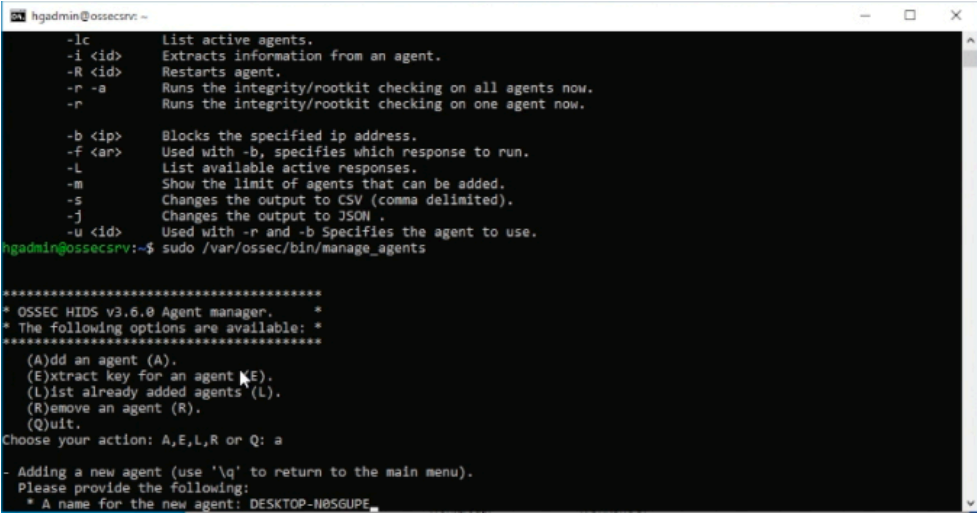
Launch the OSSEC Agent Manager once connected to your server.
sudo /var/ossec/bin/manage_agents
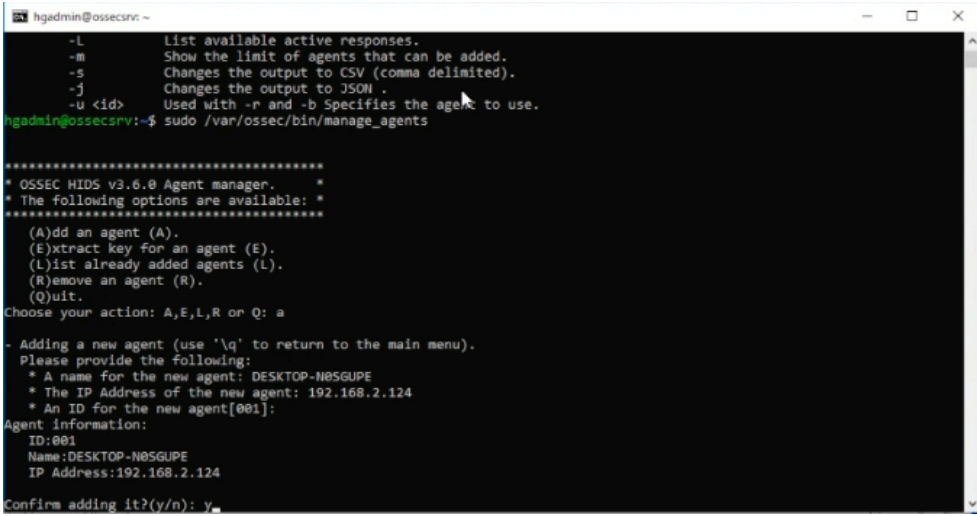
Input option (A) to add a new agent. Input your windows machines name when prompted.
Input the windows machines IP when prompted and confirm adding with responding (y)
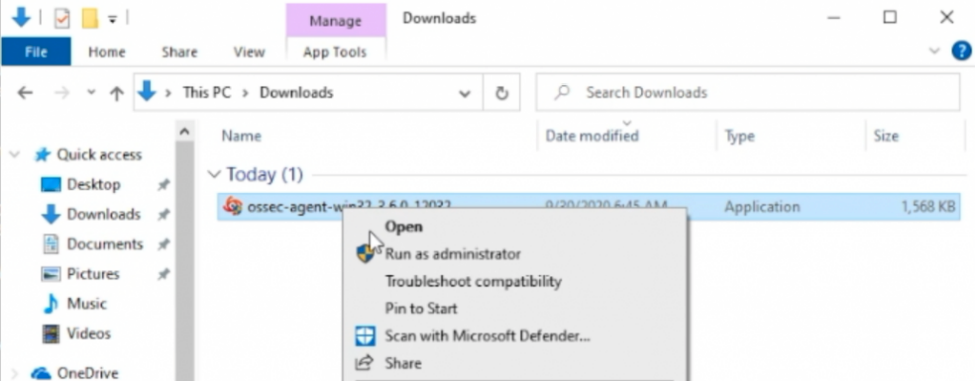
On the target Windows desktop. Launch the executable agent file you have downloaded as administrator. Should be in your downloads folder.
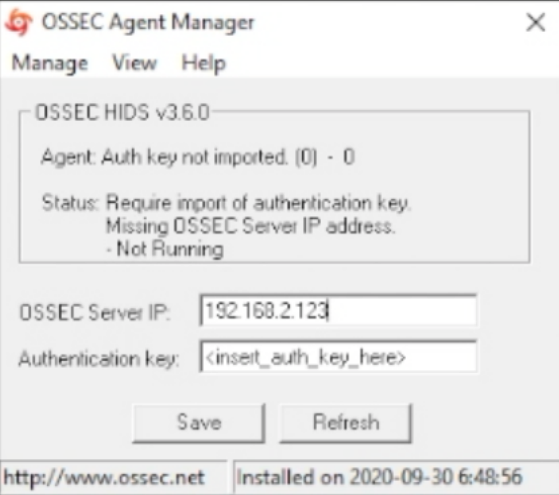
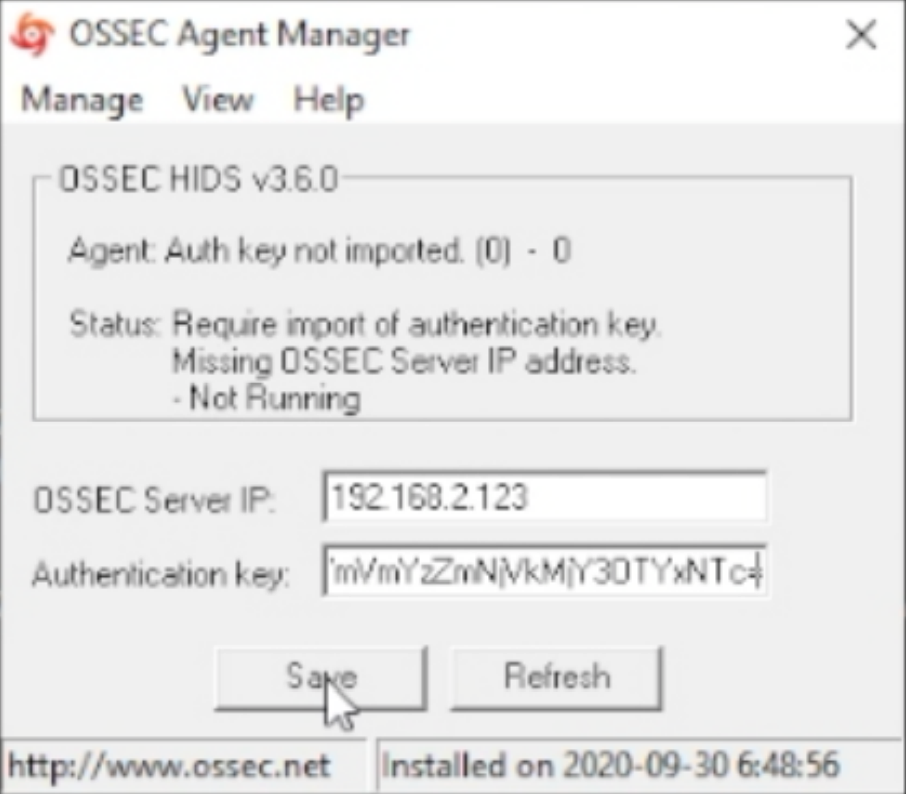
Open the OSSEC agent as administrator that you installed and enter the IP address of your OSSEC server.
Open the command prompt window that you used to ssh to the OSSEC server. Extract the Key by inputting option (e) and then the corresponding Agent ID for the windows machine in the OSSEC Agent Manager that should still be open.
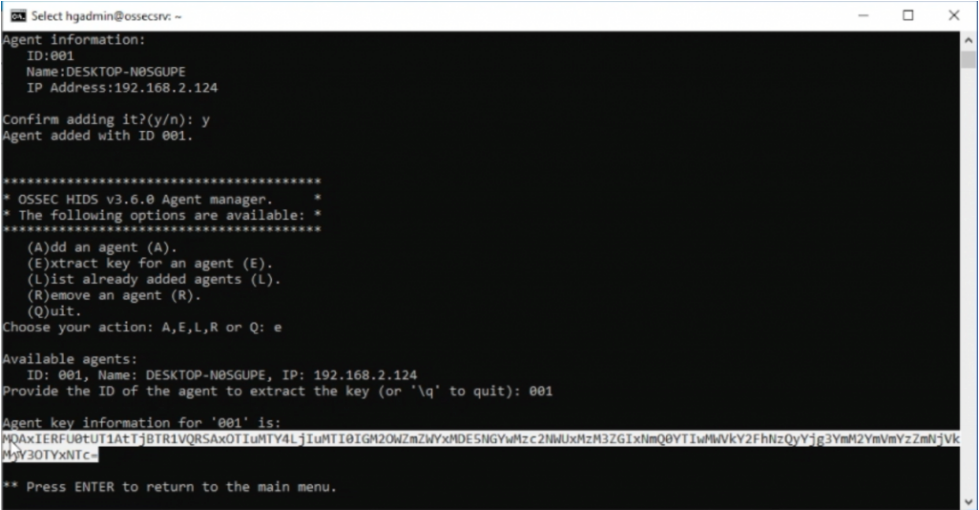
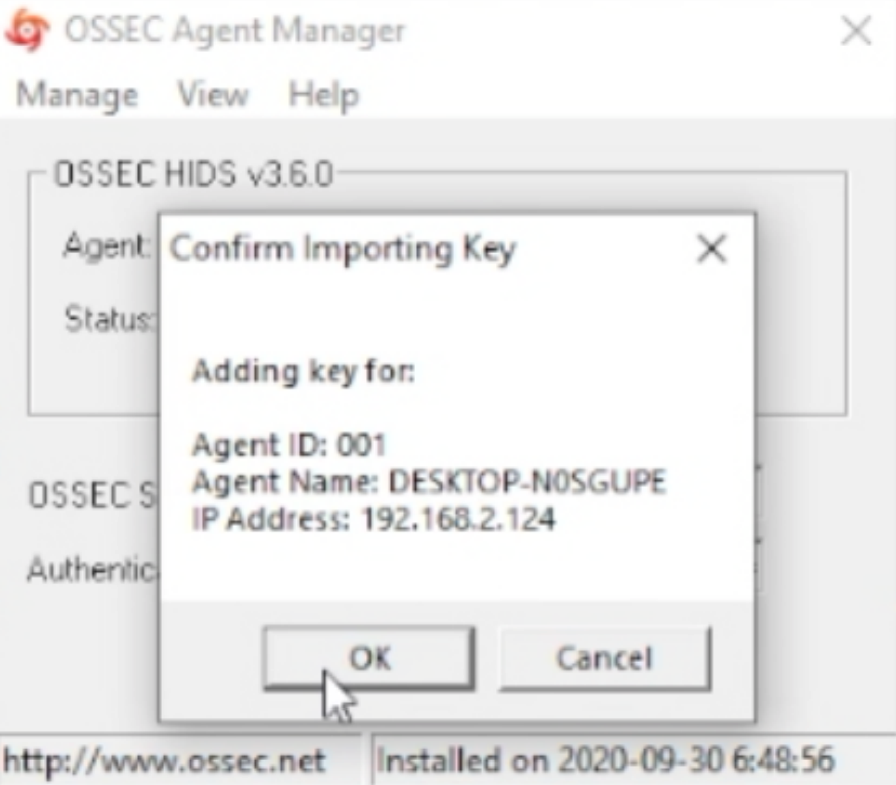
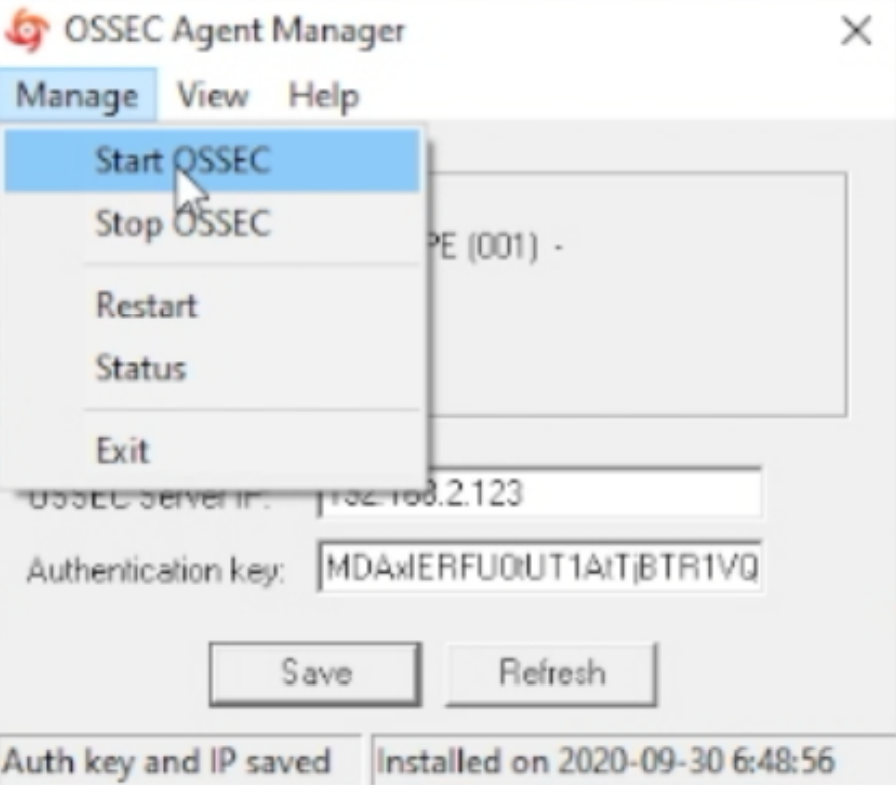
Highlight and copy the key, update the OSSEC Agent. Save the updated info and start the OSSEC Agent.
Open your web browser and navigate to your OSSEC Servers IP and specific port if you set one.
—– Guide Ends Here —–
Got a request from “dedu mihail” & “Amandeep Singh” on how to block https sites. In this quick walk-through we show how to use the proxy with manual settings which is needed to block https urls / sites. It does not work via transparent mode. (We could not find a simple way to make it work via transparent mode).
1. Configure the end user machine to use the proxy.
2. Configure the proxy on IPFire to use the url filter capability.
3. Configure the url filter to block the https url 4. Configure the url filter to allow restriction bypass for listed IP’s.
In this walk through we will show you how to install Pi-Hole to enable network wide ad blocking on your network. We will also show you how to configure a windows machine and the basic steps on how to enable it network wide via your router.
–START–
Url’s used: Pi-Hole – https://pi-hole.net/
Debian 9 (Stretch) – https://www.debian.org/releases/stretch/debian-installer/
DD-WRT – https://dd-wrt.com/
In this walk-through we will take you through the steps to Install IPFire on a Raspberry Pi.
The guide used in this tutorial can be found in the YouTube description section of the video guide.
How to secure your WordPress site quickly and easily using the plugin from iThemes Security. Active Installations in excess of 900,000.
Link to iThemes
QRadar Community Edition 7.3.1 is a fully-featured version of QRadar that you can use at home or in your lab. A new feature of QRadar Community Edition 7.3.1 enables IBM Security X-Force® Threat Intelligence IP reputation for use.
Note: “# sudo /opt/qradar/support/changePasswd.sh -a” command is used to set the QRadar WUI admin password at the end of the installation.
QRadar Community Edition v7.3.0 is the previous release.
Q1 LABS, QRADAR and the ‘Q’ Logo are trademarks or registered trademarks of IBM Corp. All other trademarks are the property of their respective owners.
This is an unofficial video.
Disclaimer – https://www.hendgrow.com/disclaimer/
QRadar Community Edition v7.3.0 is a fully-featured version of QRadar that you can use at home or in your lab. As the QRadar Community Edition install is slightly different from the Standard / traditional QRadar installation. Thought there was value in creating this walk-through.
QRadar Community Edition v7.3.1 has been released. QRadar Community Edition v7.3.1
Note: “# sudo /opt/qradar/support/changePasswd.sh -a” command is used to set the QRadar WUI admin password at the end of the installation.
Links for the ISO’s used:
Q1 LABS, QRADAR and the ‘Q’ Logo are trademarks or registered trademarks of IBM Corp. All other trademarks are the property of their respective owners.
In this walk-through we will show you how to configure your IPFire installation specifically around the proxy and url filter.
IPFire – https://www.ipfire.org